
AgIO Orientation
Main Display (expanded view)
Section titled “Main Display (expanded view)”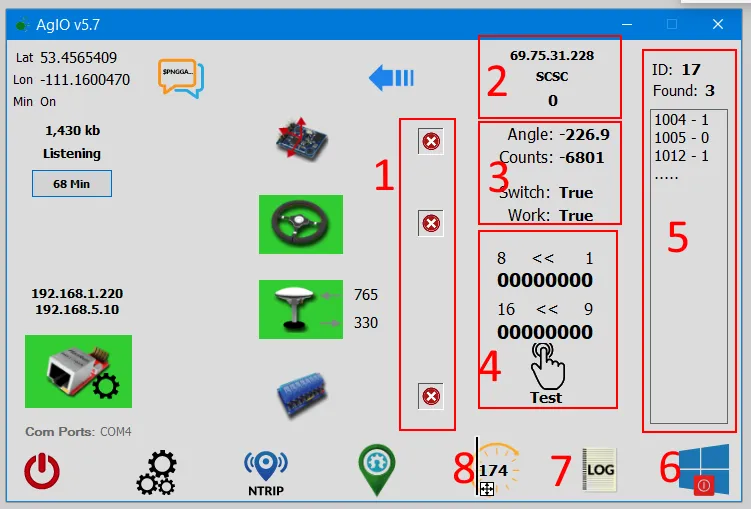
The full display provides detailed information and controls:
- Show/Hide Modules – Hide unused modules by tapping ‘X’. Tap ‘+’ to restore them.
- RTK Caster IP Address and Mount – Displays the IP address, mount, and packet bytes sent.
- Steer Module Information – Shows steering angle, raw A/D converter counts, and switch status (updates once per second).
- Machine Module Section Status – Displays section on/off status. If sections do not change to ‘1’ when activated, check for issues.
- RTK Parsing – Provides a rough estimation of station ID and sentences found. Note: RTK is complex; this is for reference only.
- Shutdown Icon – Tap to shut down Windows and power off the computer.
- Log Creation – Generates a log of incoming sentences in the main AgOpenGPS folder.
- Display Timer Reset – The extended view remains open for 3 minutes, then shrinks to a small view, and then minimizes to the taskbar after another 3 minutes. Tap this icon to reset the timer.
To hide the full display, tap the blue arrow again or minimize to the tray at the top.
Ethernet (UDP) Setup Dialog
Section titled “Ethernet (UDP) Setup Dialog”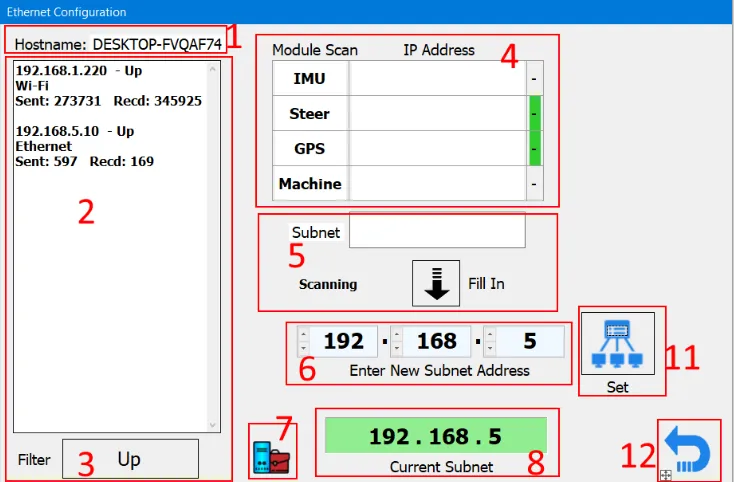
This dialog allows you to configure network adapters and subnets:
- Hostname – The unique name for your computer on the network.
- Network Adapters List – Shows all network adapters, their IP addresses, names/types, and packet statistics.
- Adapter Filter – Filter to show only connected/talking adapters or all adapters.
- Module Connections – Lists connected modules, their IP addresses, and connection status (green = connected).
- Subnet – Displays the subnet of the network adapter that sent a message to all connected modules. All devices must be on the same subnet. Tap “fill in” to auto-fill #6.
- Manual Subnet Entry – Enter and send a new subnet manually.
- Open Windows Network Management – Launches the Windows Network Management App from Control Panel.
- Current Subnet – Shows the current subnet set in AgIO.
- (Reserved for future use or additional features)
- (Reserved for future use or additional features)
- Set Subnet – Sets the subnet address for AgIO and sends it to modules. The indicators should turn green if successful.
- Return to Main Display – Go back to the main AgIO display.
Serial Connections
Section titled “Serial Connections”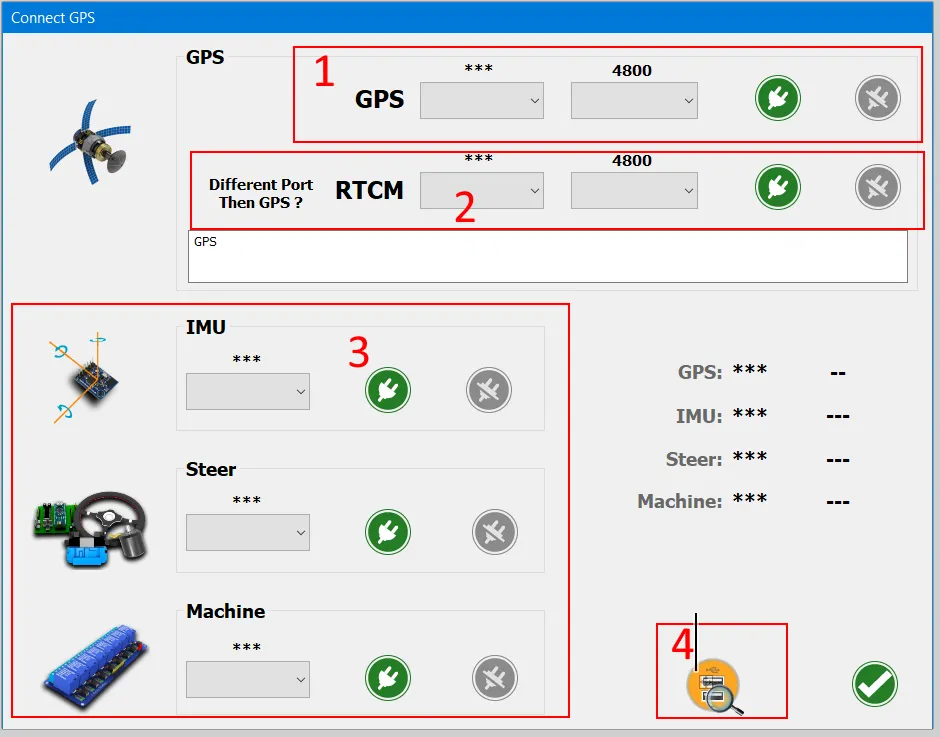
This section covers connecting serial devices:
- Serial Port Selection – Choose the serial COM port and baud rate, then tap the green connect button to connect to a serial GPS unit.
- RTK via Serial/USB – Connect here if using RTK through a serial or USB port.
- Module Connections – Connect modules here. Plug in one at a time to identify each, then connect.
- Add USB COM Port – If you connect an additional USB COM port, tap here to add it to the list of available connections.
This section explains RTK configuration:
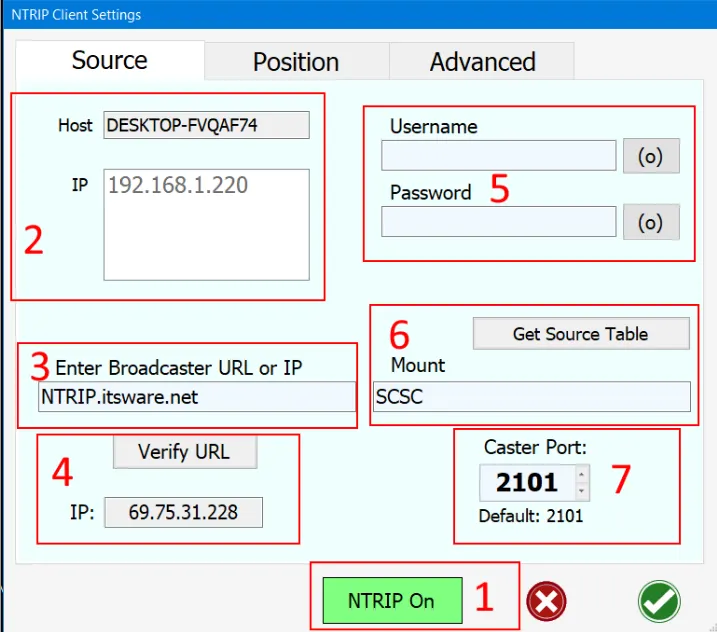
- NTRIP Toggle – Enable or disable NTRIP (Networked Transport of RTCM via Internet Protocol).
- Computer Name and Networks – Displays your computer name and all active networks.
- Caster Address – Enter the IP or URL of your caster website.
- Verify Caster – Tap to verify the caster site is accessible. The IP will be displayed.
- Caster Credentials – Enter your caster username and password.
- Get Source Table – Retrieves a list of available mounts for the caster. Select the appropriate one.
- Caster Port – The port used by the caster (default is 2101).
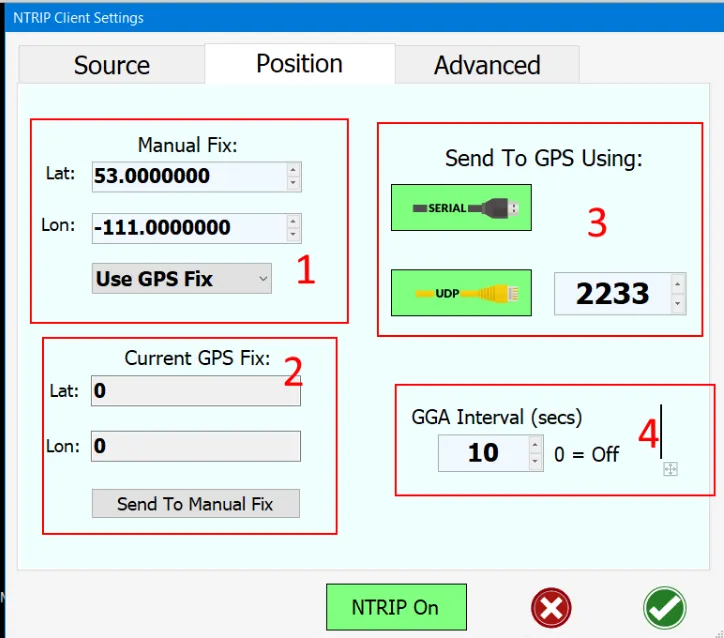
- Manual Fix Entry – Enter the current fix manually. Select manual or use GPS Fix.
- Use Current GPS Fix – Tap here to fill in the manual fix entry with the current GPS fix.
- RTK Output Method – Select whether to send RTK via serial or UDP, and specify the port. Disable unused methods.
- GGA Interval – Set how often a GGA sentence is sent to the caster. More frequent updates use more data. Set this to 0 to disable.
AgIO Settings
Section titled “AgIO Settings”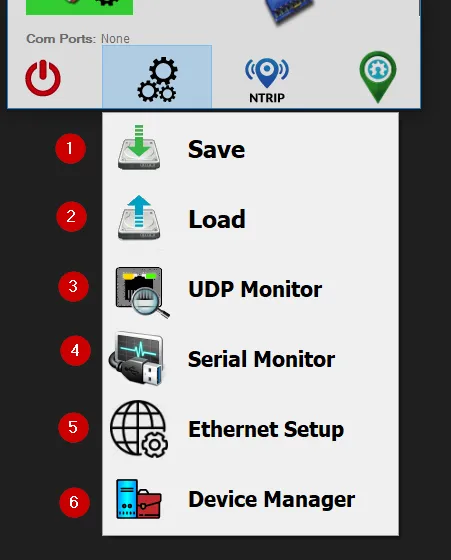
- Save Profile – Save all AgIO settings, including RTK settings.
- Load Profile – Load a previously saved profile.
- UDP Monitor – View UDP packets sent and received by AgIO, including PGNs, NTRIP, and NMEA strings.
- Serial Monitor – Connect to any serial port and monitor its activity. Useful for modules running on UDP.
- Ethernet Setup – Opens the dialog to enable or disable UDP. Only change the loopback address if you are using Linux or understand the implications. (Windows loopback settings are not supported.)
- Device Manager – Opens the Windows Control Panel applet for device hardware management.
NTRIP Settings
Section titled “NTRIP Settings”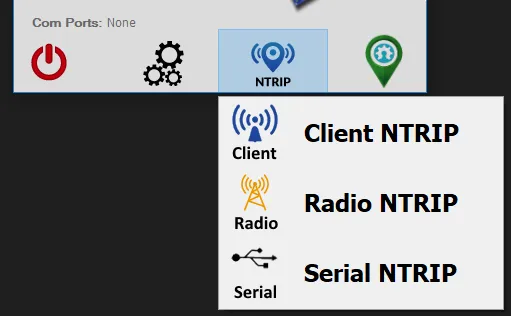
- NTRIP from the Internet – Configure settings such as caster address, mount, username, and password.
- NTRIP via Radio – Opens a dialog to configure RTK radio systems.
- NTRIP via Serial – Opens a dialog for RTK via serial input (e.g., phone USB or external radio with serial output).