Teensy 4.1 (a.k.a the brain of the board)
Overview
The brains of the AIO board is the Teensy 4.1. This component sits on the AOG board and handles the fast, hardware‑level work:
- Reads your sensors – GNSS position, IMU tilt, and wheel‑angle signals come straight into its pins.
- Passes that data to the AgOpenGPS app on the cab tablet over Ethernet or USB.
- Receives the steer‑angle command the app calculates (for example, “turn 12 ° left”).
- Sends a matching PWM or CAN signal to the Cytron driver or hydraulic valve so the steering motor moves the wheels.
In short, Teensy 4.1 is the real‑time messenger that links your tractor’s sensors to the AgOpenGPS software and turns the software’s response into actual wheel movement.
Module Selection
Make sure you get a Teensy 4.1 that does have ethernet - it is also available without, but this is not ideal for AIO board setups. Other Teensy Modules, such as the Teensy 3.2, or a 4.0 will not do - you want the 4.1 specifically.
Installation
If you buy a Teensy with pins soldered, installation is as simple as checking the ethernet pins are soldered (Ethernet Capability section), the correct firmware has been installed on the module (see configuring the Teensy section), and seating the module onto the PCB
If you haven’t bought a module with pins soldered, then solder up the header pins and follow install as above.
Ethernet Capability
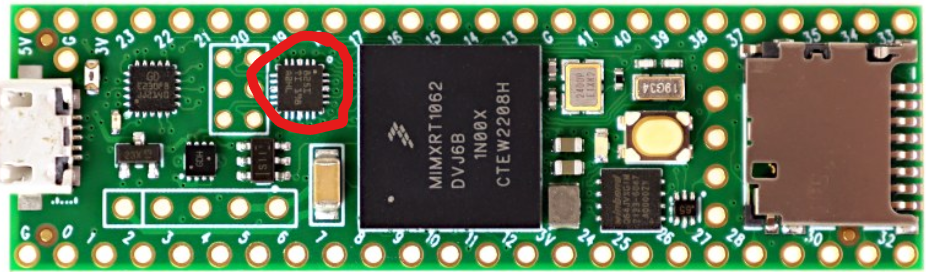
Make sure the one you order has the chip highlighted in red - that’s the ethernet controller.
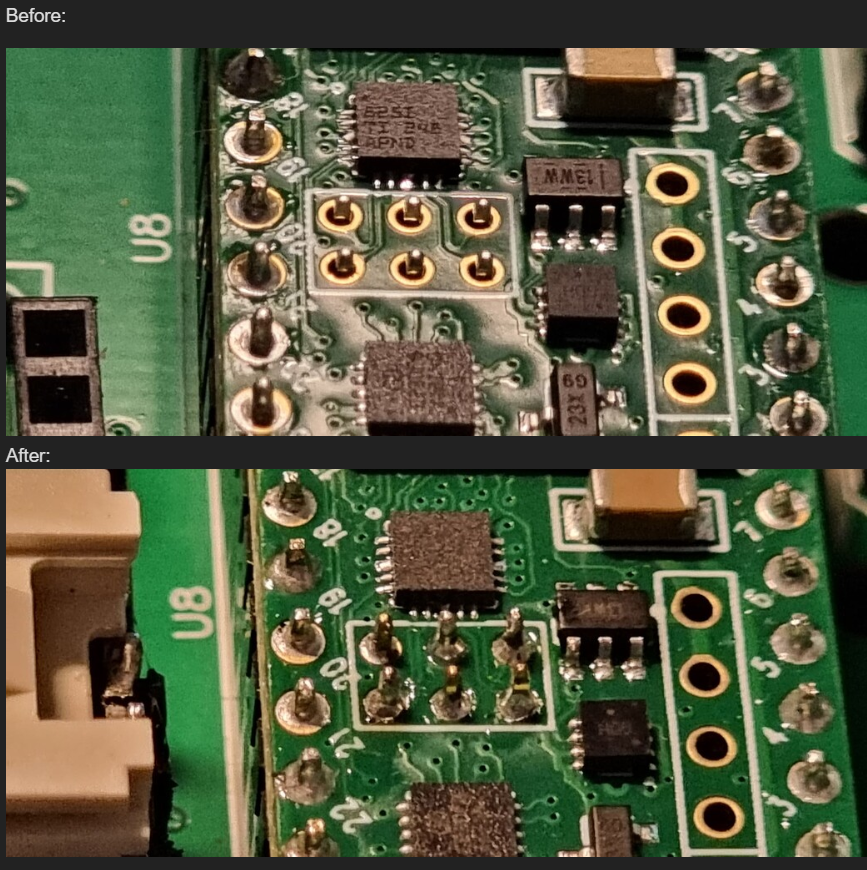
You’ll need some long 2mm pitch headers (part MTMM-103-10-T-D-355-ND work well for this) to connect Teensy ethernet pinholes to the connector on your PCB. Get the board itself with pins if you want to skip the soldering, but the soldering is pretty easy.
If you can’t find long pins, put a header on underside of Teensy (the same component as already on the standard AIO board), and use standard length pins.
You MUST solder those pins
Sample suppliers
Configuring the Teensy
There is a much easier way to do this now, using AOGConfigOMatic. See this page. if you follow the steps there, then you don’t need to do any of the below!
Before you go any further, don’t plug the Teensy in just yet!
Then, retrieve the code and unzip it.
NOTE: it may be version 5.5, 5.7, 5.7.1 whatever is in the support folder. Go with the latest that’s there!
You will need:
- Arduino IDE 1.8.x (legacy version). Version 2 has some issues occasionally, so don’t use that
- TeensyDuino - use 1.5.7, this is known to work.

Your downloads folder will likely look something like this:

And while you’re at it, right-click on the ZIP file with the code from Github, and do Extract All. Accept the default locations.
Grab the Arduino IDE from the link above and install it. Accept all the default during the installation. If you get asked to install device software or other drivers, agree:


Once that’s done, install TeensyDuino.


It should find your Arduino IDE (you did accept the defaults, didn’t you?) so accept that:

Who likes a good library? You do! Install them!

And when it’s done, you’ll see something like this:

You can plug your Teensy in now over USB - and make sure it is removed from the Panda or All-in-one-boards!!
Now would be a great time to make sure the drivers are OK. Right-click on your Start menu (or long-press the start menu if you’re on a touch-screen), and pick Device Manager.

Find the Ports (COM & LPT) section, and open it. Your Teensy should be there, without any red crosses or exclamation marks beside it. Note that your port number, in this case COM3, will likely be different. Remember that number, it’s important. Also, to aid in identification, make sure you don’t have any other devices plugged in that might be assigning COM ports (eg, your ZED-F9P modules):

Then, you’re going to load the software to your Teensy. Start the Arduino IDE. If you see any messages like this, select “Allow Access”:

It’ll come up with an empty “sketch”, but we don’t care about that. File, Open and find your way down into the files you extracted:

Once you’ve found that folder, pick the file shown (it will be named the same as the folder - and the version might well be different if a new one is released and this wiki page hasn’t been updated):

Another instance of the Arduino IDE will open (you can close the empty one), and now we’re just about ready to send it to the Teensy. However, despite having the IDE and TeensyDuino installed, the Arduino software doesn’t actually exactly what model of Teensy you have (it might have guessed it right, it might not), so we need to check some items on the Tools menu. The first to pick is the board, so go make sure 4.1 is picked.

You might notice when you return to the Tools menu, that there are more options on there now that weren’t there before. Don’t worry about that.
We can lower the speed to 450mhz which will keep the chip a little cooler with no ill effect:

There will likely be a choice for the Port, so make sure you’ve the one that says Teensy 4.1 picked and ticked:

Now the exciting part - you’re a software developer for the next few minutes. Click the second icon on the toolbar, the Right-arrow, and all being well, it should compile it and send it to the Teensy! Depending how decent your computer is, this may take anything from a couple of seconds to a couple of minutes. Watch the green progress bar down the bottom:


You might notice a couple of warnings - ignore those. Red text means something has gone wrong tho, in which case paste a screenshot or the text in Discourse/Telegram and ask for help.

The Teensy flasher (ahem) might pop up and ask you to press a button the Teensy - that’s the big white button if so - but it might well just crack on and flash it for you. Watch for the flashing red lights on the Teensy. And then when it’s finished… nothing. Silence. Just that screen, and no lights on the Teensy (the reason it was likely flashing when you plugged it in for the first time is it was running what’s known as the “blink sketch” - code that does nothing more than flash the little LED).
So, how do we know it’s working? We go to the monitor!

It’s likely saying something like this:

And congratulations - your Teensy is now running the AgIO code! You can put it back in either the Panda board, or your all-in-one board now!
(Sorry tho, that’s possibly your software developing days over)
Problems
I got weird red message in text! Help!

First thing to do is CHECK YOUR MODEL! If it’s not set to Teensy 4.1, it won’t work. And every wrong model will likely throw you a different message. Go back above and set it properly.